Pure woodworking joints look beautiful and valuable.
But isn’t it far too much effort?
As a certified carpenter from Germany I work with pure wooden and mechanical joints on a daily basis.
Therefore I can provide you with first hand information. I will show you what kind of joints we often use in our part of the world and what you should know about them.
In addition I will cover woodworking joints used by and joiners and cabinetmakers.
The best of all: Regardless if you are a pro or a hobby craftsman – anybody can recreate these joints.
 © CC0 | CC0 1.0 Universal
What are woodworking joints used for?
On building sites these joints are used for wooden structures like walls, ceilings and roofs.
In cabinetmaking they are used for creating corner connections, tenons or similar joints. In most cases planks, boards and square timbers are connected with each other.
When searching for “woodworking joints” on Pinterest the results are endless. There is basically no limit for possible woodworking joints.
 © CC0 | CC0 1.0 Universal
Generally we distinguish between corner connections, intersections, junctions and lengthening joints.
The connections between the different parts have to absorb high forces, therefore it is important to follow the indicated dimensions.
The differences
- Pure wooden joints consist primarily of wood and can be secured by screws, bolts, dowels and pins.
- Mechanical joints use anchors, steel sheet mouldings, screw or nail connections.
- Cabinetmaker’s joints are made mainly of wood and are secured by glue and nails.
The forces at the panel points
Each component is exposed to certain forces.
Regardless if in cabinetmaking or construction, the incurring forces have to be safely transferred and absorbed. Due to that reason a tidy construction is necessary.
The construction decides which forces must be absorbed at the panel points.
There are many different forces to distinguish, for example compressive, tractive and thrust forces.
In the following figure of a roofing the affecting forces are indicated through red arrows.
Question: What forces appear at rafters, purlins or posts?
It’s important to mention that the wood also has to have the needed density. Some woods have a higher resilience than others. Also the grain direction plays an important role.
For a better overview I divided this article into three big parts:
- Pure wooden joints
- Cabinetmaker’s joints
- Mechanical joints
Pure wooden joints
All joints are divided into categories to provide guidance.
The main categories are:
- Lengthening joints
- Corner joints
- Framing joints
This list does not include all possible joints but it is a great help on how to built a clean joint at home or at a construction site.
You can find further connections of this kind in this article.
Did you know?
The oldest connection made out of wood was dated back to 5100 B.C. At an excavation site near Leipzig a notched rim of a well was found.
Lengthening joints
Lengthening joints are mainly used to connect two beams lengthwise.
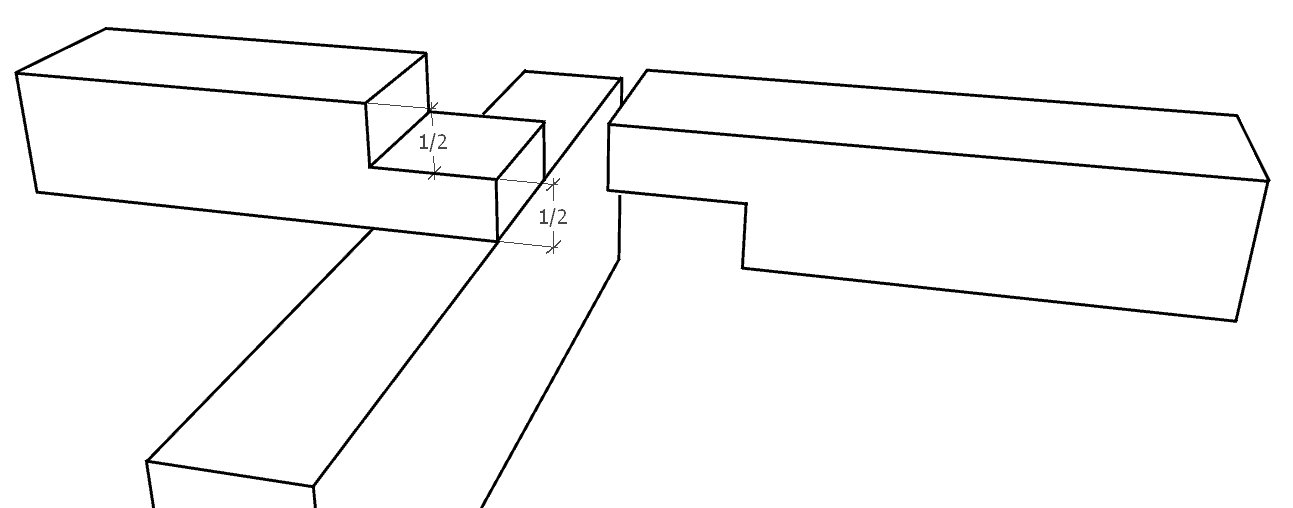
1. Halved scarf joint
 © Samuel J. Schneider BAUBEAVER
For a halved scarf joint half of the beam width is cleared away.
Some craftsmen add a hook to this connection. The shear plane of the hook is extremely low, though, which is a problem of this connection.
For erecting this is an advantage, but from a static point of view this connection is not very useful.
Further solid techniques for connecting beams you can find in this article.
2. Dovetailed scarf joint
 © Samuel J. Schneider BAUBEAVER
This connection type is basically a simple half lap joint with an additional dove tail. It is very practical and effective.
It plays an important role statically and simplifies the process of erecting.
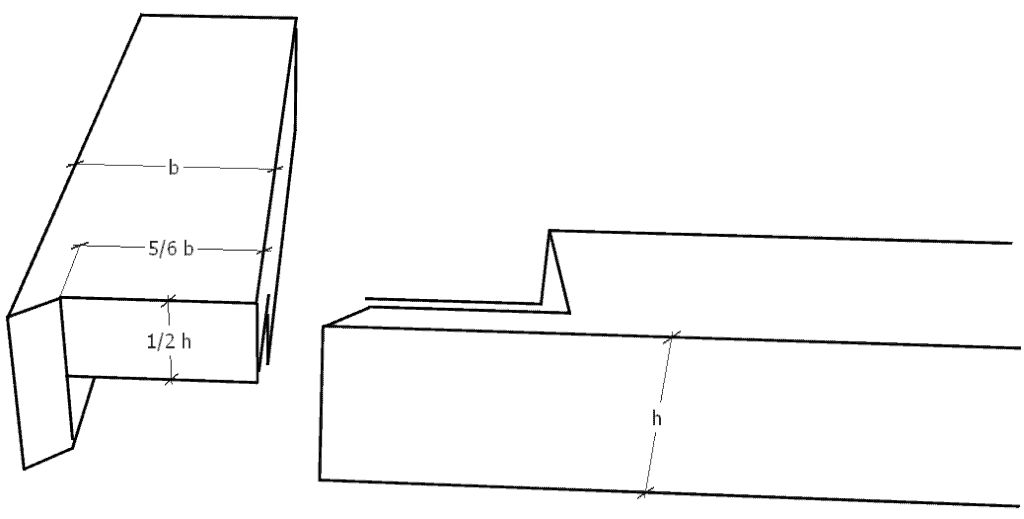
3. Rabbeted stub tenon
 © Samuel J. Schneider BAUBEAVER
This is a much more detailed connection.
Many measurements are necessary to get this joint done.
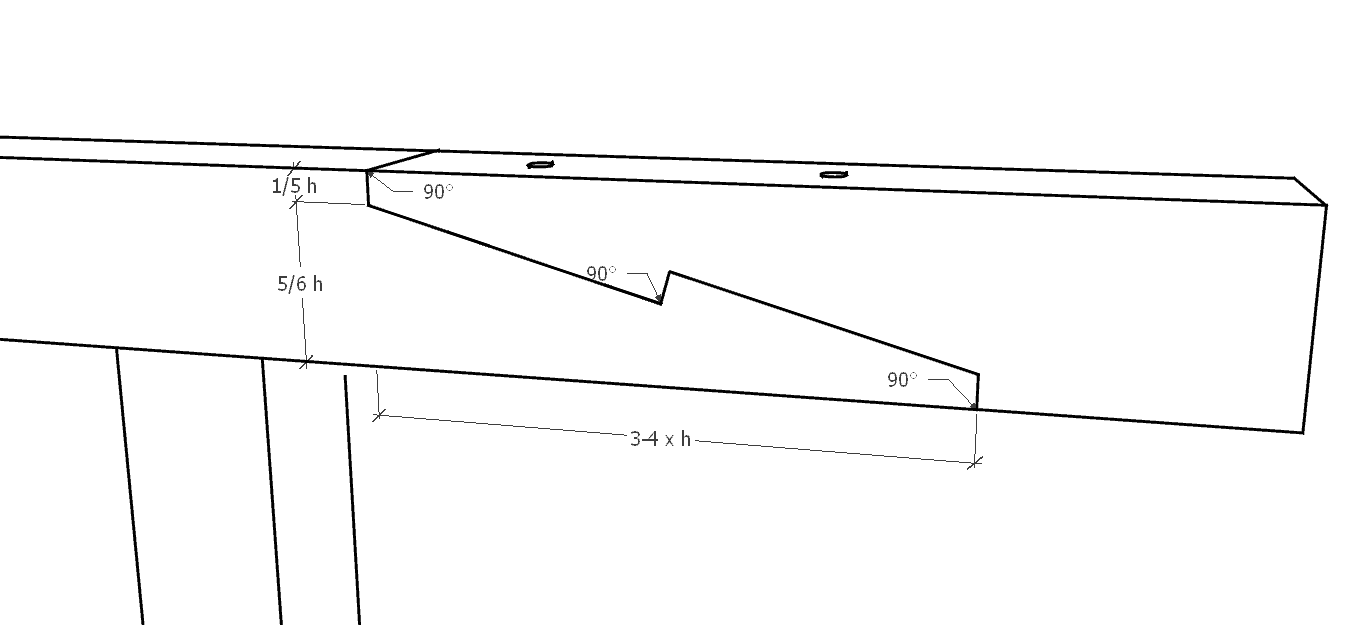
4. Oblique hooked scarf joint
 © Samuel J. Schneider BAUBEAVER
The hooked scarf joint is a very resiliant lengthening joint, it can handle both tension and compression forces.
These joints are common for the construction of timbered houses as well as in normal house construction.
There are different possibilities to recreate this connection, although it is not quite easy. You can find further help in my e-Book.
For more detailed information to this scarf joint look up this article.
5. Oblique scarf joint with hidden hook
 © Samuel J. Schneider BAUBEAVER
This joint is made almost like the hooked scarf joint. It is also quite similar to the pinned oblique scarf joint.
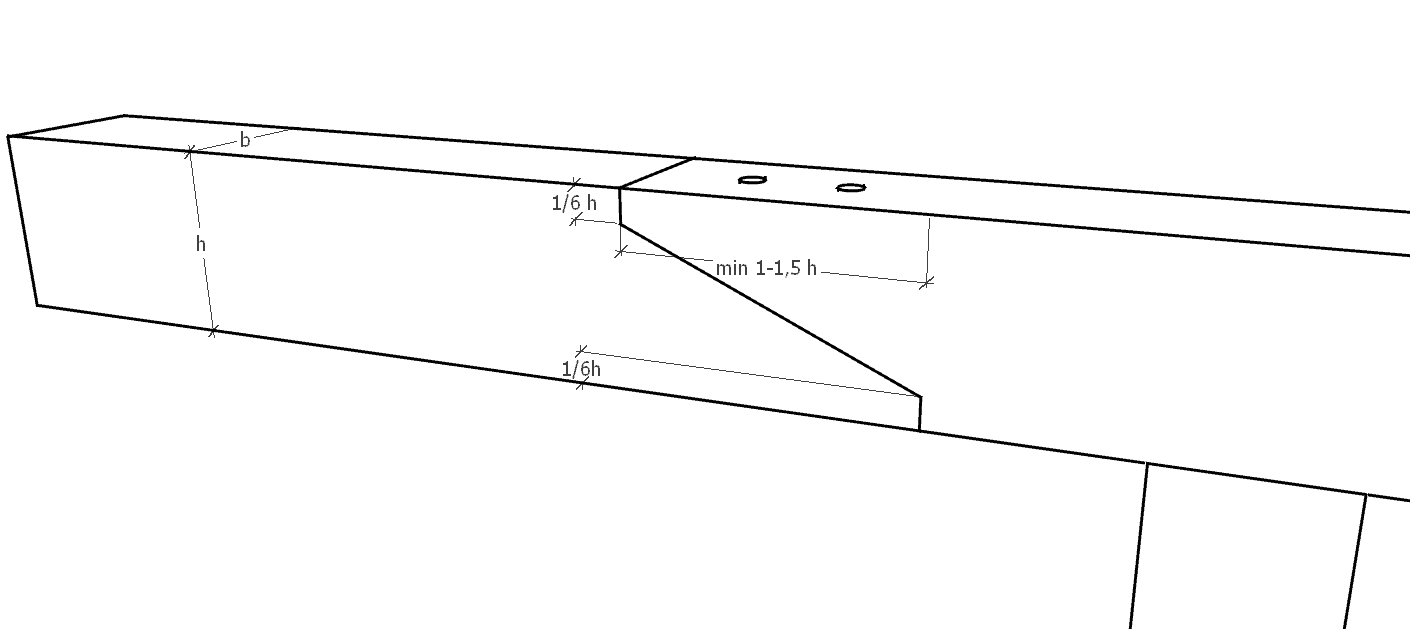
6. Oblique pinned scarf joint
 © Samuel J. Schneider BAUBEAVER
This lengthening joint is used for joining two timbers with larger cross-sections to form one longer piece. Examples are center purlins, ridge purlins or girders.
The main advantage of this joint is that the complete cross-section can be taken into account for bearing the load. For a simple half-lap joint this is not possible.
When drafting it must be remembered that the upper beam should rest on the bearing point and the lower beam is fixed underneath. The other way around it would lead to cracks.
Bolts are used to secure against lateral movement and hold both pieces together.
Further information you can find in this article.
Corner joints
Regardless if you are constructing a carport, a truss or a simple canopy – for two beams meeting at an angle you will need an appropriate corner joint.
In the following part you can find the most important and common joints used in construction.
Further joints you can find in this article.
Product recommendation
Corner joints are best made with a japanese saw. Here you can find a list of the most popular japanese saws.
7. Half-lap joint
 © Samuel J. Schneider BAUBEAVER
Similar to the halved scarf joint half of the beam width is cleared away. When joining the parts the surfaces are at one level.
The joint becomes stable when reinforcing it with screws or sheet metal parts.
It is the simplest connection and can be done in a short time.
8. Bridle joint
 © Samuel J. Schneider BAUBEAVER
This joint requires time in making since it is more difficult in detail.
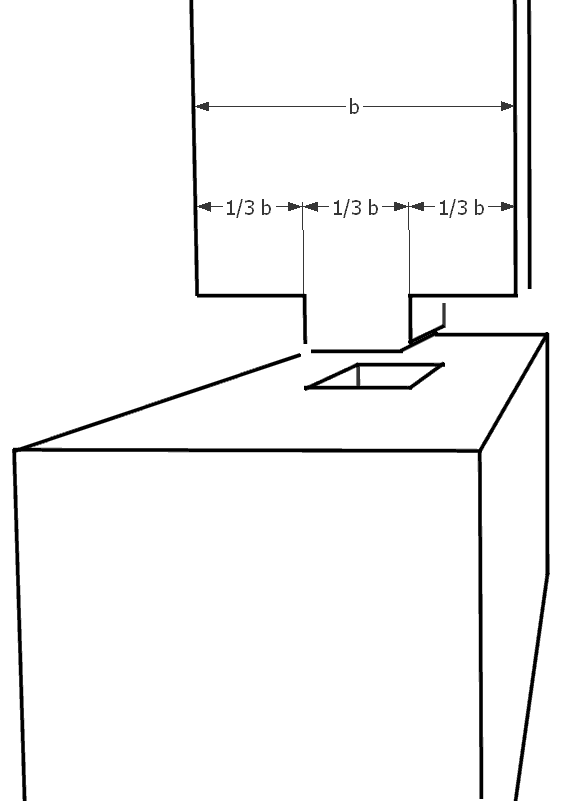
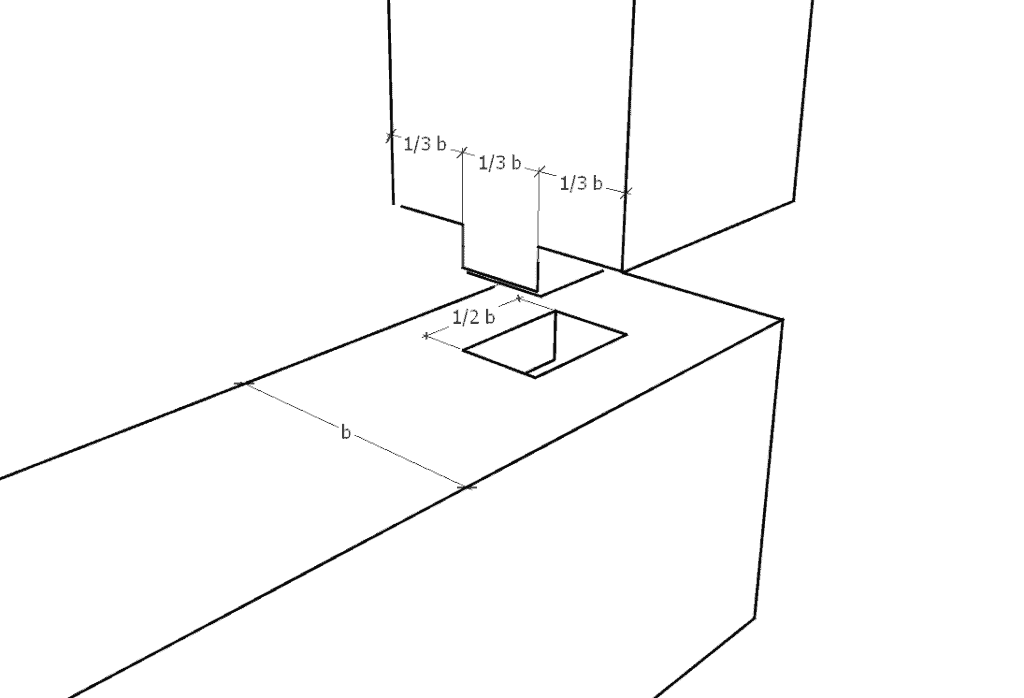
First the front end of the first timber is divided into three parts to cut out the tenon.
Then a mortise is cut into the front end of the corresponding second timber.
These joints are very useful for constructing door and window frames.
9. Bevel lap joint
The bevel lap joint is one of the most complex corner joints. Because it has an oblique surface it is not as easy to draft as the half-lap joint.
The main advantage is that not many connectors are needed. By the oblique surface the timbers automatically are held in position.
This corner joint is especially useful for connections which have to carry loads (i.e. carport, truss, canopy and more), but it is time consuming to make them.
In an easier version of this connection only one edge is cut off obliquely.
10. Concealed half-lap joint
In some cases the end-grain should not be visible, either for weather related reasons or for the look itself.
A concealed half-lap joint serves this purpose. It is manufacured similar to the half-lap joint, just adding some intermediate steps to hide the end-grain.
Did you know?
Woodworking joints became more and more detailed around the year 3500 B.C. Back then tenon and mortise were used.
Framing joints
For these so-called junctions two timbers are connected at a right angle. Often tenons and tongue joints are used.
11. Stub mortise and tenon
.
There are different sorts of tenons. A stub tenon is chiseled out over the whole width of the beam.
12. Haunched tenon
When some beams have to be mounted at an angle haunched tenons are used.
The advantage lies in an easy and fast erecting, lateral shifting is also prevented.
Oblique framing joints
To connect timbers at a certain angle different oblique joints can be used.
13. Oblique thrust joint / face staggered joint
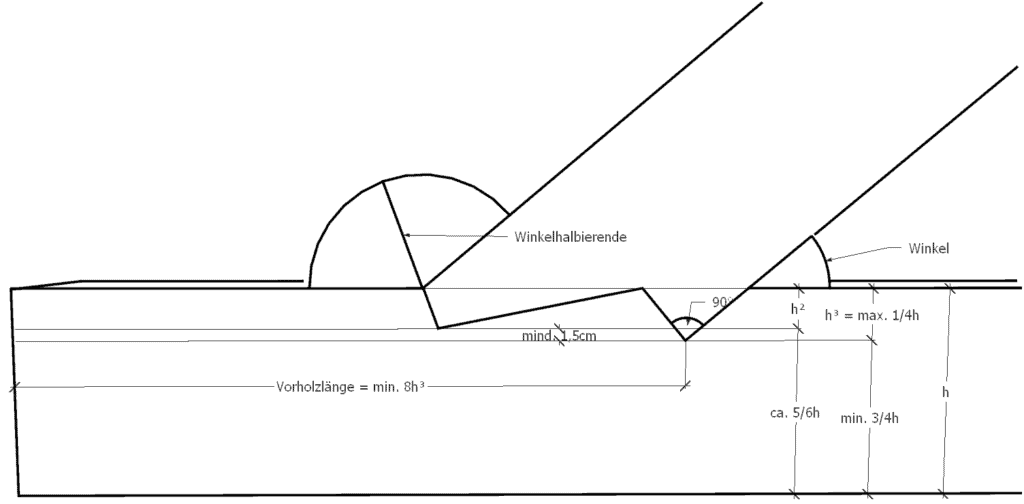
A wedge-shaped notch is cut into the load bearing beam. In this notch the compression beam is fitted.
Thereby the front face forms the bisector of the obtuse exterior angle.
Usually an additional screw bolt is used to prevent lateral shifting. This bolt should be at the same angle as the front face of the compression beam. The minimum shear plane has to be 20 cm.
Constructionwise the oblique thrust joint is not very recommendable.
Why?
To guarantee 20 cm of shear plane a lot of timber is wasted.
For more help regarding the oblique thrust joint refer to this article.
14. Notched housing
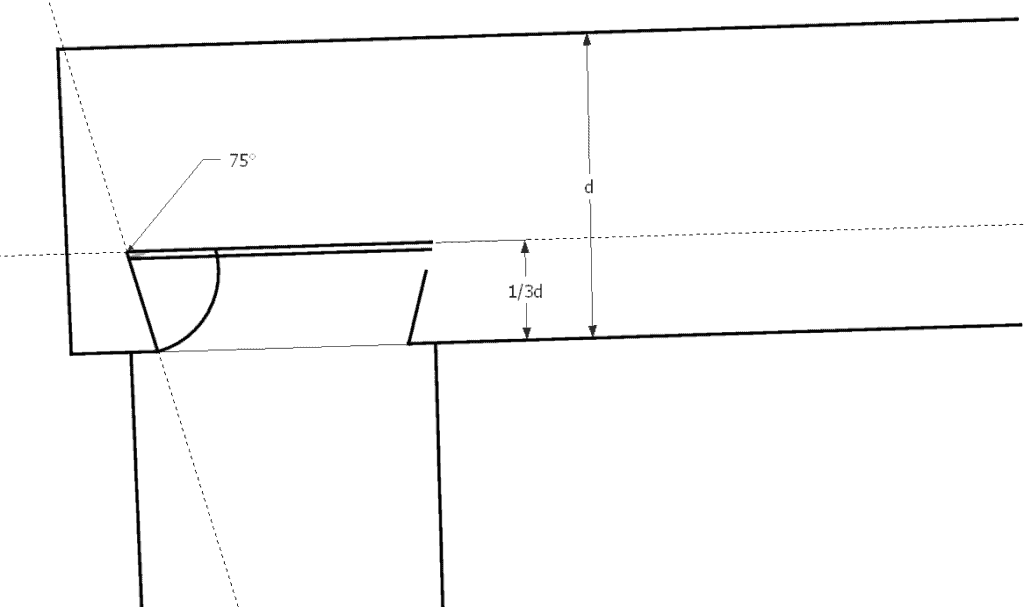
A notched housing should have a debth of 1/4 to 1/6 of the beam height. The beam projection requires a length of 8 times the debth of the notch or at least 20 cm.
Furthermore a gap of 3-5 mm has to be included.
The notched housing saves a few centimeters of the beam and is therefore more recommendable than the oblique thrust joint.
15. Oblique thrust joint with notched housing
Even more stability is gained with this combination of the oblique thrust and the notched housing.
It is important to keep in mind that the notched housing has to be at least one cm deeper than the oblique thrust. Otherwise both shearing planes would clash.
Further important oblique framing joints are covered in this article.
Cross joints and halving joints
Cross and halving joints are used when two intersecting beams have to be secured.
Examples are tier of beams with binders or window frames with a number of glass panes which need to be seperated.
Product recommendation
Cross joints are best made with a japanese saw. Here you can find a list of the most popular japanese saws.
16. Halved crossing joint
Any joint in which two pieces of wood are fixed across one another is called a cross joint. When cross-section weakening does not play a role both timbers can be notched up to half of their width.
In case of a load-bearing component like a post this would not be allowed.
17. Double notched joint
For creating a double notched joint both timbers are cut with notches to receive each other.
The post is cut only as deep as necessary so it can still fulfill its static requirements.
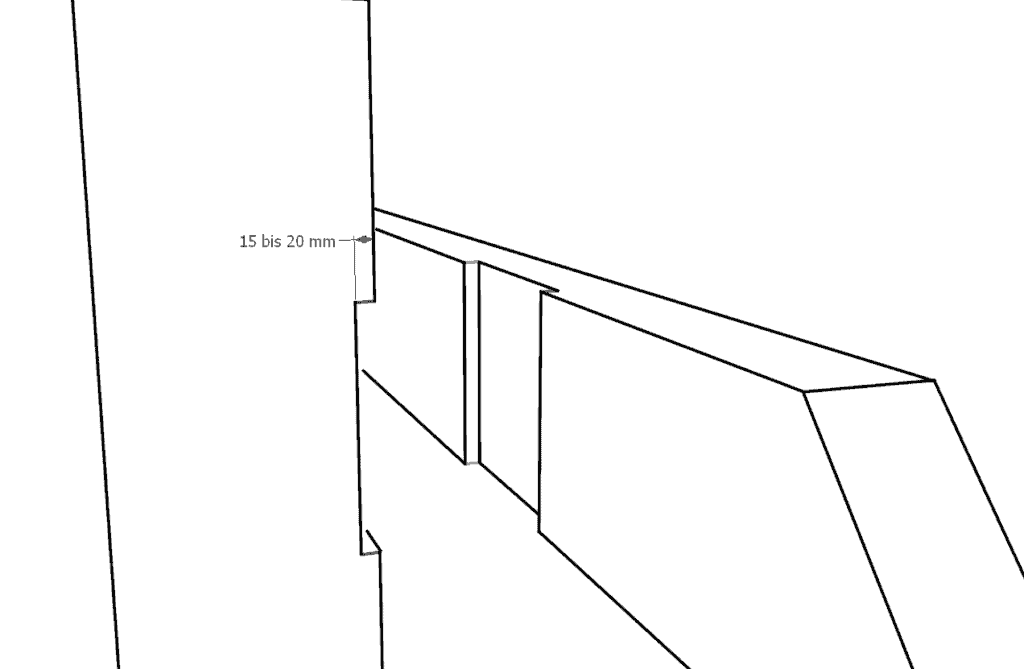
Notches of 1,5 cm to 2 cm are sufficient for this joint. In addition both parts are secured with a screw bolt or a wood screw.
Did you know?
As of the 15th century CE these joints became more and more complex, thanks to the toolmakers. With continually improving axes, hatches and saw blades countless woodworking joints were made.
18. Crossed tenon joint
Drafting this joint is easy: By joining the particular timbers and the connecting of the four corners a cross is formed.
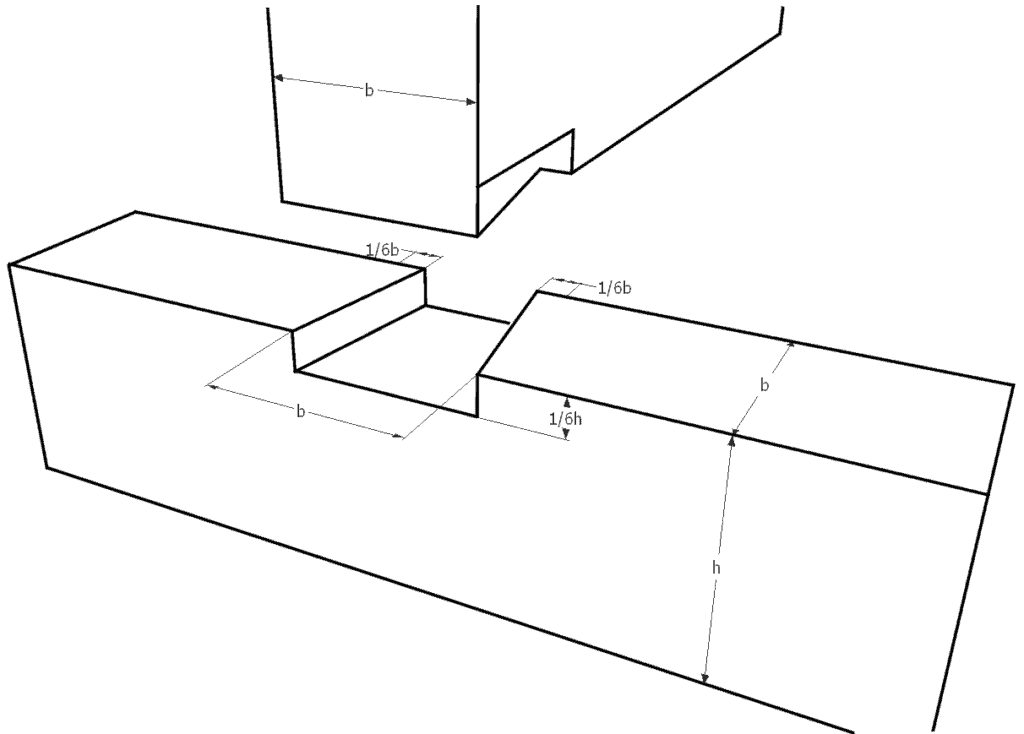
1/6 of the height of both parts is removed to create two parts that fit into each other.
The draft might not require a lot of time, but the execution does. Everything has to be done by hand since the recesses are difficult to reach with mechanical equipment.
19. Dovetail lap joint
The dovetail lap joint is a very practical cross joint.
The main advantages are a simple erecting and a high resilience regarding tensile forces.
In comparison to other notched joints drafting is quite easy.
20. Birdsmouth
The well known birdsmouth joint is used when a rafter meets a purlin.
It prevents the shifting of the rafter and helps significantly during the erecting process.
Usually the rafters are fixed with wood screws, rafter anchors or nails.
Mechanical joints
Mechanical joints are made with additional fasteners, for example sheet metal parts, anchors or bolts.
The main advantage of these joints is the saving of time.
21. Nailed joints
Especially in the USA nailed joints are used frequently.
With predefined nailing patterns planks and boards can be used for stabilize roofs. This joint can absorb tension as well as pressure forces.
Freely suspended girders are just one example. The nailing pattern is determined statically.
Joints with sheet metal parts
According to DIN 1052 (Germany) solid wood or plywod may be connected with corrosion-protected sheet steel.
Ribbed nails which are also specified through DIN act as fasteners.
There are different forms of these joints. Mentioned below are the most improtant ones appearing on building sites.
22. Flat sheets
The thickness of flat sheets needs to be at least 2 mm, according to DIN 1052 (Germany).
These fasteners are used to connect nodal points.
23. Rafter anchors
These so called anchors are used to connect rafters and purlins. Ribbed nails are used to fix the metal sheets to the respective part.
24. Angle connectors
Angle connectors are not only used for cabinetmaking, but also on buidling sites.
They come in different sizes and models, for example with and without centre bar.
25. Joist hangers
Joist hangers are used to connect beams in corner connections, like a recess in a roof construction.
They are also useful when beamed ceilings need to be replaced.
Bolts and rod anchors
26. Anchor connections
Two wooden parts are put flat to each other and secured with metal dowels. In earlier times wooden dowels were used as well. With this connection mainly the dowels carry the forces affecting the buiding component.
There are various models, sizes and forms of dowels. Usually diameters range between 50 to 165 mm.
Thread bolts are used for additional securing.
These bolts prevent a tilting of the anchors but never carry loads.
Just as the nails the anchors also have to follow a certain pattern. This applies to the distance to the timber edge as well as the space between the anchors.
Depending on the wood moisture the thread bolts have to be retightened.
27. Shear plate connector
This anchor type consists of a light metal alloy, absorbs shearing forces and is secured with a thread bolt.
To force-fit this connector the construction timber has to be accordingly adjusted.
It is important to make sure that the timber is not unnecessarily damaged in the process. This may happen if a drilling is too deep or a cross-section too large.
28. Wooden dowel
The wooden dowel is similar to the shear plate concerning the function. It absorbs shearing forces and is secured with a thread bolt also.
These dowels are made of hard wood. To force-fit this dowel type the construction timber has to be accordingly adjusted.
29. Toothed plate connector
This connector is also called dog tooth timber connector and is made of special purpose steel or malleable cast iron.
It has to be secured with thread bolt, washer and nut.
You want to know more about simple timber joints with metal? Take a look at this article.
Cabinetmaker’s joints
There are three main types of joints cabinetmakers use: butt joint, miter joint and scarf joint.
30. Butt joint
To create a butt joint two square-cut components are connected with each other.
There are different ways to creat and aligne a butt joint, for example with a bisquit joiner which is not visible later on.
Making this joint is fast and easy but of course requires the right tools.
31. Miter joint
Both components are cut at a certain angle, usually at 45 degrees.
The main advantage of this joint is that it has a bigger surface than the butt joint.
Additional connection types can be used, for example bisquit joiners or dowels.
32. Scarf joint
To create a scarf joint about half of the width of the two parts is cleared away to connect them with each other. Both components need to have the same width.
This joint can be extended with a miter joint so the surface of the connection is bigger. This way the stability is increased.
33. Dado joint
A dado joint has a higher stability than a butt joint or a miter joint, since three surfaces are being stressed instead of only two.
No additional fasteners (like bisquit or feather joiners) are needed.
This joint can be recreated with low effort.
The component can also be constructed with only a bisquit or a feather joint. In this case corresponding mortises are cut into both parts.
Another option for more stability is adding a rabbet. More contact surfaces mean a higher stability.
34. Mortise and tenon joint
Both carpenters and cabinetmakers use this joint which consits of two connections.
One is the mortise which can be either rectangular or round, the other is the mortise.
There are different techniques to create this joint.
Manually chisel and mallet are used, mechanically a mortise machine or a slot cutter are needed.
When using mortise machine or slot cutter a cylindrical form occurs at the bottom end of the mortise. Due to this reason the mortise should be chiselled out1 or 1,5 cm deeper than the tenon.
Usually the tenon is made with a circular saw or a handsaw. These tenons can be milled out by machines also.
An open mortise and tenon joint is very similar in making. The mortise for this joint has three open slots and is often used for window and frame construction.
35. Dovetail joint
The dove tail joint is probably the best-known and most complex connection. Because of its form and the many contact surfaces it is one of the most stable connections.
By this connection two boards meet at their edges at a right angle and are virtually interlaced.
There are different types of this joint, for example the finger joint (also called box corner joint or combed joint) which consists of many straight cut tenons.
This joint means less effort than for example the dove tail joint.
When no glue is added the joint can be undone by simply pulling the boards apart.
Dovetail joints are undercut just like the conical tenon of the dovetail lap and dovetail scarf joint.
The effort is significantly higher than for the finger joint but a lot less glue is needed to hold everything together.
These joints can be made open, half or fully concealed. It is even possible to hide all end grain and this way combine high stability with beautiful design.
36. Dovetailed housing
The part to be housed is dovetailed over the whole length. On the corresponding board a dovetailed housing is made.
This is a very detailed joint which is loosened by pulling the boards apart sideways. Little or no glue is needed.
In summary
There are endless possibilities to combine different woodworking joint types, therefore it is impossible to list every single one of them. Also there might be differences depending on which country you live in. This article covers the most important joints used in Germany.
For every project a different joint type is needed. Hopefully this list is a help for you to find the right woodworking joint.
In case you are looking for an even more complex option, have a look at this article about japanese woodworking joints.
In both carpentry and cabinetmaking accuracy is required. Often a cabinetmaker needs to be even more precise cause these joints are very delicate.
Precision is everyting in cabinetmaking, especially during marking and drafting, while in carpintery the critical aspect often is the proper calculation. In all cases it is necessary to work highly accurate and precise.








Actually have learnt about joints alot from this page thanks alot (Deogratius Mamai)from busia county at the border of kenya in malaba
Hi Deogratius Mamai,
thanks so much for your comment!! 🙂 I wish you much success with your project 😉
Deogratius sounds like deo = god, gratia = thanks, mamai I suppose to mean a lot 🙂 Anyhow, great page! Thank you very much (Dankensieschöne) from Berlin.
Thanks Anton 🙂
Happy of you sharing the knowledge,I would like to work with
your company
Hello !
I’m a French student in master degree and I am writing my mémoire on woodworking professions.
Also, I have so much struggle in finding the equivalent in English of a technique we call “aboutage” in French. Meaning to glue together two boards of wood in the length sense, end-to-end. I don’t know if I am being clear enough but I hope I am.
It will be amazing if you could help me on finding the precise term in English for this technique !
Thank you !
Mrs Paquot
Hello Harmony Paquot.
Yeah, I think I get what you mean. In English it means “glued sawn timber”.
In German this is called “keil zinkenverbindung” – just by the way. 😛
Hello,
I am fascinated with wooden houses and I am starting to put together information to start building my own house.
For a 64 square meter house with a livable attic what would be the most appropriate wood (essence) and most efficient joints to use throughout the build. I would like to avoid using a lot of metal joints.
Hello Alexandru Dilimot.
Thank you for your comment.
This is very complex. Usually I look at the construction plans and give detailed advice. If you want to order this, you can send me an email.
been gathering material to build a cabin, ive built alot of houses but never one out of beams and timber framing…. ive been entertaining the thought of the whole ordeal and now after studying this site, im completely stoked right now.. i learned that i need to invest in some handsaws… thanks brutha man
Hi jake Humphry,
thank you for your comment. And good luck!